Wednesday, May 14, 2014

Tackling Progression Part III

In Part II, we discussed the Finish Phase in detail and added in a progression to use as well as video of the drills against air and with bags. Part I detailed how we use the progression and how we identify the different phases of tackling.

Now, we will discuss the Strike Phase as well as Strike & Finish drills.

The Strike Phase begins as the defender starts to initiate contact with the ball carrier.

This phase incorporates an aggressive double uppercut action with the arms as well as rapid and forceful hip extension into the ball carrier.

We use five drills in the Strike Phase and start by teaching the rapid hip extension and then adding the double uppercut action. Finally, we will reteach the Hit Position (athletes who have been in our strength program are already well versed in this position) before we put the entire action together while standing.

I don't have video of all these drills against air, bags and partners, but you will just add someone in holding a bag for the Knee Strike and Strike drills. I think the Strike drill works best with a Pop-Up Bag that players can basically run through without having to add in the elements of the Finish Phase. The Superman and Superman Uppercut drills can be used without those bags on the ground, but the players are more likely to commit to selling out if they know they're landing on something comfy.

Oh Snap!

You need to install Silverlight to watch Hudl presentations.

Download Silverlight

Need help installing Silverlight? Click here.


Some key points for these drills...

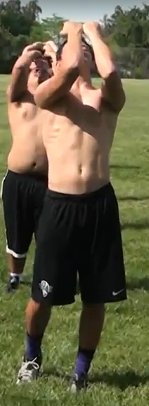
1. Superman: I did a bad job of this when I introduced it last year, but the athletes should have their hands behind their back so they can really concentrate of forcefully extending their hips.
2. Superman Uppercut: This is where we add the arms and the double uppercut action
3. Knee Strike:  This is the same motion as Superman Uppercut, only now the players take a knee. I make them switch knees after every rep so we get even work on both sides.
4. Hit Position: Use a cadence to get athletes in the proper position. I lost the audio on the video here. We start with "Feet" and the athletes settle their feet hip distance apart. Next is "Arms" and the players stick their arms behind their back as far as possible. After that is "Sink" and the athletes sink into a half squat. The last cue is "Holsters" and the players will put their hands on their "gun holsters" by bending their elbows. Once we've mastered this by using a cadence, we will just tell the players "Hit" and they must quickly assume the Hit Position.
5. Strike: This is the drill that most closely resembles an actual tackle since we are standing and incorporating both the double uppercut and hip extension.

Once we progress through the Strike Phase, we will bring the Strike & Finish Phases together into one fluid (hopefully!) motion.


Oh Snap!

You need to install Silverlight to watch Hudl presentations.

Download Silverlight

Need help installing Silverlight? Click here.


The goal is for the fundamentals of each phase to start transitioning into multiple phases as we add them together. As you can tell in some of the video, there are a fair amount of players who are missing some important concepts of the Finish Phase. There are a handful of athletes who aren't doing a good job squeezing their elbows together in the Clamp and many aren't putting their eyes to the sky as well.

Part IV will detail the Pursuit Phase, which consists of the Profile and Buzz tackles and include a document for our strict progression over the spring and summer.

Thursday, May 1, 2014

Tackling Progression Part II

In Part 1 of my tackling progression series, I detailed why and how I came up with a progressive system to teach tackling.

This next part encompasses how I teach the fundamentals of tackling through a progression of drills, starting with those in the Finish Phase.

As with all drills we teach, we want to go from simple and planned to complex and reactive. Doing simple and planned drills will allow all participants to gain confidence and develop the necessary skills to complete the drills that are complex later on.

Nearly every drill in the progression can be done on air, against a bag or with a partner.

In our section in California, we have "Spring Football" during the month of May. We're limited in hours per week, but we also can't use any equipment except a football. So, we start our tackling progression on air during May, beginning with the Finish Phase and ending with the Pursuit Phase.

Once June hits and we are in summer mode, our section allows us to use all equipment except for helmets, shoulder pads and leg pads. Now, we will use bags (shields) and go back through the entire progression.

When we go to our own team camp in Lake Tahoe and are in full pads for the first time, we will do our first live contact partner drills based on the progression. We will not go back through the entire progression, but hit the main concepts in a circuit instead.

After finishing camp I will evaluate where we need to begin reteaching tackling during the start of fall practice. Every year is different. We also gain players during the fall who weren't around during spring or summer football, so they must be instructed from the beginning.

FINISH PHASE DRILLS

The first drill we introduce is the "Clamp". Players start with their feet hip width apart and slightly staggered. Their hips should be fully extended and I use the term "Shamu" to get them to make a small arch in their lower back similar to this a killer whale explosively jumping out of the water.


The defender's hands are above his head with closed fists grabbing cloth (pinkies together). Players should squeeze their elbows together and focus their eyes to the sky.

We teach this fundamental with coaches roaming around a giant layout of players so everyone can go at one time. Coaches correct on the fly.


Next, we add the fundamental of driving the legs through the tackle. The next drills are "Clamp & Slow Drive" and "Clamp & Fast Drive".

Players need to pull the "ball carrier" into their body and drive their knees high and wide during the Drive portion of these drills.

Often, players will forget some of the Clamp fundamentals once the Drive fundamentals are added. I've noticed that the biggest problem with players usually involves them not squeezing their elbows together while forming the Clamp.

Check out the Hudl Presentation with video of all three drills.


Oh Snap!

You need to install Silverlight to watch Hudl presentations.

Download Silverlight

Need help installing Silverlight? Click here.

Sunday, April 6, 2014

Tackling Progression Part I

Me in 2011: "You can't teach tackling. Either the players want to do it or they don't"

Me in 2014: "2011 me was an idiot."


When I first started coordinating I didn't have a progressive system to teach tackling to players. I had drills, a ton of them, but their was only a semblance of some type of purpose to them.

I didn't teach fundamentals well enough, I didn't keep my vocabulary consistent and when we were bad at tackling (and in 2011, we were terrible),  I didn't have a system in place to correct my players.

Following the 2011 season, I knew we had to improve, so I started looking into ways I could create a progressive system to teach tackling. By the start of our practices for the 2012 season, I had bits and pieces, but had yet to create the system I wanted.

Last spring I began chronicling the progression through the use of a PowerPoint presentation and started to take video of our drills.

My goal was to create a progression we could use program wide and refer to consistently from the freshman level on up to the varsity level.

None of this is original in thought... I "borrowed" most of it from a PowerPoint that steelhawk put up on Coach Huey first. Then, I listened to Coach Tim Murphy speak at a Glazier Presentation, watched some USA Football "Heads Up Tackling" videos, watched Bobby Hosea videos, reviewed tape of how Chris Ash teaches tackling, and continued to get other resources on Coach Huey. I just rearranged and changed some things to fit my liking and my situation.

We start by introducing the 3 phases of a tackle going from the position a player finishes a tackle in to how he starts a tackle.

1. Finish Phase
2. Strike Phase
3. Pursuit Phase

The Finish Phase includes the fundamentals of Clamp and Drive. Clamp is the act of holding onto a ball carrier with one's arms. Drive is the act of pumping one's legs and driving their hips through the ball carrier.

FINISH PHASE
The Strike Phase includes the fundamentals of the hit position, the violent double uppercut action of the arms and the popping of the hips and chest through the ball carrier.

STRIKE PHASE

The Pursuit Phase includes the two types of tackles a player sees during the course of the game: Profile and Buzz.

A Profile tackle occurs when a ball carrier is moving horizontally away from the defender and you can only see his "profile".

PROFILE TACKLE
A Buzz tackles occurs when a ball carrier is coming head on with a tackler and has a two-way go.

BUZZ TACKLE
Part II of this series will include video of some of the drills we use to practice these fundamentals as well as the progression it's completed in.


Monday, May 6, 2013

The Birthplace of the Pistol: 2013 Nevada Spring Game


While in Reno for the California State Athletic Director's Association yearly conference (yes, a state conference was held outside of the state), some of our coaching staff took the time to take in the Nevada spring game and get an up close and personal view of where the Pistol began.

Traditionally, we have been a flexbone, inside veer/midline team that also got into shotgun, predominantly to throw the ball. One problem we consistently ran into was a lack of a similar running game out of shotgun.

Now, we are going to begin infusing a Pistol look as our base backfield set. We will be able to keep the rest of the offense pretty similar, but will have to re-tool the mesh and steps for the QB, fullbacks and slotbacks.

Leading up to the game I read a fair amount of local newspaper articles and new Head Coach Brian Polian noted that they would be pretty vanilla on both sides of the ball as not to give anything away for their opening game.

Nevada used 11's personnel and this look A LOT!


Some quick things I took from the Wolf Pack Spring Game:

#1 - Nevada lived in 11's (1-back, 1-TE) personnel. They moved their H-back/TE around a lot pre snap with different motions and he was always on the move post snap, crossing the formation to kick out a DE or lead up on a LB.
#2 - Different plays looked extremely similar from a big picture standpoint. This constantly put the DE's in conflict. Nevada primarily ran inside zone, Power and a Power Read.

Count the numbers... How do you not run some sort of option football?

#3 - Their biggest play was consistently the Power Read. especially when their athletic QB pulled the ball and got to the perimeter.
#4 - Offensive linemen splits differed throughout the game. I'm sure this is an adaptation to the play call. The guard-to-center split varied from about one to three feet and the guard-to-tackle split varied from about two to three feet.
#5 - I was impressed with how well the defense tackled throughout the game. They were extremely effective in open field situations.

Friday, April 12, 2013

How to play with pressed CBs in Cover 4


I had the chance to listen to Michigan State Defensive Back Coach Harlon Barnett speak at the 2013 AFCA Convention.

Prior to the clinic, I had heard about the Spartans' use of pressed cornerbacks in their version of Cover 4. I was hesitant to give that version a shot because it seemed as if it would further isolate my corners, and it would also be difficult to play our version of 2-Read coverage.

After hearing Coach Barnett speak, I opened my mind a little bit and might use some pressed corner looks this summer.

Here's some notes from the nearly hour long lecture...

VS. PRO I


Key Points
- CBs line up 2-3 yards inside #1 WR
- If #1 WR is inside the divider, the CB lines head up
- Safeties line up 1x9 outside of the End Man on Line of Scrimmage
- Safety on weak side makes "MOD" call, which means "Man on Demand" or stay in man
- Safety on strong side makes "Box" call. The safety will take #2 man-to-man on any route over 10 yards. If #2 is not vertical past 10 yards, he will find the QB and play the football.
- The CB on the strong side has #1 on any route over 5 yards. On any route under 5 yards, he zones off his 1/4.
- If #2 is a TE or RB, you step downhill on the snap
- Eye control: Safety keys #2  (w/ no TE, key guard)
- Backside Safety has cutback (creates 9-man front)

VS. EMPTY


- To the 3 WR side, the Spartans play "Midpoints". The CB splits #1 and #2 at 8 yards and plays the ball. The S splits #2 and #3 and plays the ball. The safety will key #3 and lean towards him on any vertical route. Basically, they are playing Cover 3 to this side.
- To the 2 WR side, Michigan State can play a ton of calls... Read (2-Read), Box, Cloud, Dog (2-Man)
- If hurt by quick game, play man

VS. TRIPS


- Weak side CB plays "MOD"
- Weak side safety is in a B-10 alignment (B gap at 10 yards).
- Weak side safety makes a "Yo-Yo" call, which means he will take #3 on the any vertical route.
- Can play any coverage call to the #1 and #2 WR to the strong side.
- Strong side safety is 1x10 off the #2 WR, not the ball.

General notes
- Using a pressed corner forces the WR to be predictable when running routes
- Using a pressed corner forces the WR to bubble his release which messes up timing
- Using a pressed corner takes away the easy quick game, which is one of the pitfalls of Cover 4
- Safeties use a slightly staggered stance with inside foot up. Inside foot should move first.
- Press: Off-hand jam aiming for near pec
- CBs read WR hips through "Move" area (0-18 yards)
- CB needs to cutoff and control after the "Move" area. CB needs to keep running.
- CBs will use an outside alignment in "Read" (2-Read) unless the WR is outside the divider

Thursday, April 4, 2013

Defending 11's Personnel with the 4-2-5

One question that consistently gets asked on CoachHuey.com and one I get a fair amount of questions on is how to line up or defend 11's personnel with the 4-2-5.

The greatest asset of the 4-2-5 is its flexibility and that comes in handy when defending 11's personnel.

In my eyes, there are three basic 11's personnel formations you will see:

#1. Pro Ace
#2. Pro Trips Ace
#3. Pro Trey Ace

Of course there are plenty of variations with receiver and back alignment, shotgun, pistol and other looks, but we'll stick with those three.

To simplify things, I will line up and play base defense in one of two ways:

#1. If I want to stop teams that run predominantly to the TE side, I will play an Under front and Cover 3.

#2. If I want to stop a strong passing attack, I will play an Over front and Cover 4.


Easy enough?

Let's assume we are in the middle of the field

We'll start with what I call Pro Ace.


We call our Over front "Tight", which tells our (M)ike LB to set the front strength to the TE side. Across the front, we are in a 6i, 3, 1 and 5. The (F)ree Safety will set the secondary strength to the passing strength, so he will make a "Right" call here. Both our F and (W)eak Safety will make a check to their side based on their rules. With a #2 detached to the free side, we make a "Read" call and play 2-Read. With 1-back and 1-WR to the weak side, we make a "Read" call and play 2-Read.


We call our Under front, "Split Tough". Split tells the M to set the front to the split end side (or away from the TE) and Tough tells our safeties to play 1x1 off the TE. Normally if our (H)ammer or weakside end gets a TE to his side, he gets in a 6i and makes a "G" call which tells the (N)ose to move from a 1 to a 2i. When we use our "Tough" call, the ($)trong Safety will tell the H "Tough", which tells him to stay in a 5 and cancel the "G" call.

When we play Cover 3, we set the secondary strength to the TE side when one is present. This allows us to put our $, who is usually the better run defender out of him and the W, to the TE side. He is usually a better player for us at playing on a TE as well. We play Cover 3 with similar rules to Saban's Rip/Liz, with some notable differences, but our $ and W will carry the vertical of #2 until #1 comes shallow. Our F splits the #2's (here, the TE and slot WR) and plays high hole.

Moving on to Pro Trips Ace...


We use automatic trips checks for different formations. I won't signal in that we are going to play Special Sky, we will just game plan it that way. I just signal in we are playing Cover 4 here. Again, we are in an Over front and the F is setting the secondary strength to the 3 WR side. We run Special by playing man-to-man on #3 and playing 2-Read to #2 and #1. On the weak side, we play Sky.


Again, when we play Cover 3, we will set the secondary strength to the TE and our F will adjust if he needs to. We are in "Split Tough" (Under) up. Our F is now taking the vertical of #3 to #2, the W is carrying #2 vertical and our (C)orner has the vertical of #1.

Tuesday, February 12, 2013

2012 in Review: Cover 0 Blitzes

Our defense bases out of zone coverage.

When we want to bring pressure, we do so predominantly out of Cover 3. But, we also have a Cover 0 package as well.

Our Cover 0 pressures are categorized two ways: Bomb (Linebackers) and Bullets (Safeties).

When we run Cover 0, we do so to effect the quarterback in the passing game and to bring additional defenders to the party in the run game. It's also a pretty common short-yardage call for us.

In our Bomb blitzes, our Cornerbacks take #1 man-to-man, our free safety takes #2 to the passing strength man-to-man, our weak safety takes #2 to the away side man-to-man (or the back out his way in 2-back). Our strong safety takes the running back (or the back to the passing strength in 2-back).


We ran 23 bomb blitzes over the course of 11 games this season and gave up only 47 yards (2.04 average), and added an interception and two sacks.  On the flip side though, we gave up seven touchdowns.

So, what do these numbers mean?

Well, at first glance, it would seem that our Bombs were go big or go home plays. Further digging revealed that six of the touchdowns were given up inside the 10-yard line. The only score we gave up outside of the 10-yard line was a 20-yard pass for a TD on a first down.

In our Bullets blitzes, we send both safeties against two back sets. When the offense presents a one-back formation, our weak safety will make a you/me call to the LB on his side and that LB will replace him on the blitz while the weak safety takes #2 man-to-man. Otherwise, every other defender does exactly as he does in the Bombs.


When we ran our 18 Bullets blitzes last season, we allowed 3.83 yards per play and three total touchdowns while forcing a fumble and collecting two sacks. Two of the three touchdowns came inside the 10-yard line and the biggest play we gave up was 32 yards on a 4th and 7.


Looking at the numbers would make it seem like we had a fair amount of success blitzing out of Cover 0. We may look to use those blitzes in more than just short-yardage and goal line situations and use them on early downs as well. Cover 0 doesn't play into my normal, bend, but don't break philosophy, but I also like to get out of my tendencies when I can.

A lot will ride on how good our secondary can play man-to-man against some of the more athletic teams we see throughout our league schedule.

Any thoughts on trends/stats that I'm missing or not seeing through the correct lens?